I’ve been interesting in generative coding or creative coding for a long time spending my time in the different alleys of subreddits. So, I finally decided to venture into this using the opensource C++ toolkit called OpenFrameworks. This post will have a short guide on installing the toolkit and my first code written using it.
Installation
This won’t be a comprehensive guide but rather points to stuff that needs to be done to get it running (as of today) on Linux.
- The OpenFrameworks community recommends latest nightly over 0.11.2, the current stable version. You can find nightly builds at the bottom of: download | openFrameworks.
- On the same download page, you can find the link for instructions to install (Here’s the link for Linux instructions).
- There’s a high chance that you might face some issue related to
SNDFILEwhile compiling usingcompileOF.shfile. The fix for the same can be found over at this patch file (I found the patch file through the comment section of the coresponding AUR package). You can either apply the patch (I don’t know, as of now) or apply it manually since its only 2 lines of code related to linking header files. - You should also setup the Project Generator and the QT Creator IDE.
Please note that the libraries in OpenFrameworks uses relative reference for files and folders with respect to the parent folder where the package is extracted and compiled. Hence, it is easier to compile the code if your project is present in the OF/apps/myApps/ folder where OF is the extracted folder.
Also, I personally use VSCode and makefile for editing and running the code since qbs (QT Creator) was having multiple issues related to linkage of library. With these issues discussed, let’s move on to my first code.
First Code
Concept
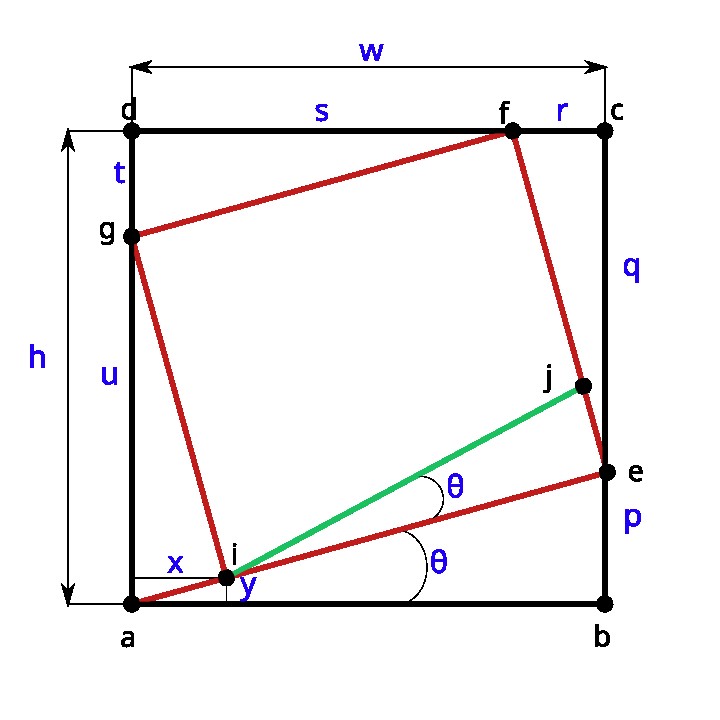
The idea is to generate a “spiral of squares” if that makes any sense. It was actually inspired by a similar hand-drawn art that I saw while scrolling through instagram (sorry, couldn’t share source). What we are going to do is to create a simple trignometric math around the concept and then implement the same as part of the code. The idea is as follows:
 ◎ Black text corresponds to nodes and the blue text corresponds to dimensions
Each of the distances in the above diagram can be derived based on three parameters - $w, h, \theta$.
- $p = w\tan\theta$.
- $q = h - p$
- $r = q\tan\theta$
- $s = w - r$
- $t = s\tan\theta$
- $u = h - t$
- $x = u\cos\theta\sin\theta$
- $y = u\sin^2\theta$
Then, the nodes can be represented as points in space with node “a” as origin.
- $a = (0,0)$
- $b = (w,0)$
- $c = (w,h)$
- $d = (0,h)$
- $e = (w,p)$
- $f = (s,h)$
- $g = (0,u)$
- $i = (x,y)$
The idea is to initially set the point a as origin and compute all the points relative to that. Then, after connecting all the points, we can set the point i as the next origin and change the orientation by $\theta$. Thus, the inner square/rectangle becomes the starting point for the next iteration.
Implementation
For the implementation, there are three major code files in the project folder.
└── src
    ├── main.cpp
    ├── ofApp.cpp
    └── ofApp.h
The main.cpp file is the one which actually executes the program. The ofApp.h is a header file which is mainly used to declare the ofApp class and its corresponding functions. The actual definitions of these classes exist in the ofApp.cpp file. For example, setup() function is used to define static objects such as background and keyPressed(key) is used for events related to keypress.
| |
In order to take save the generated output as an image, we declare an ofImage object in the ofApp.h file as below.
| |
Then, we update the following function in ofApp.cpp as follows:
| |
Now, for our drawing, we update the draw() function. This function is executed for every frame. Hence, though it is a static image, it will still be updated relative to the window size. I’ve put the code below and commented it to reflect my indent on doing so.
| |
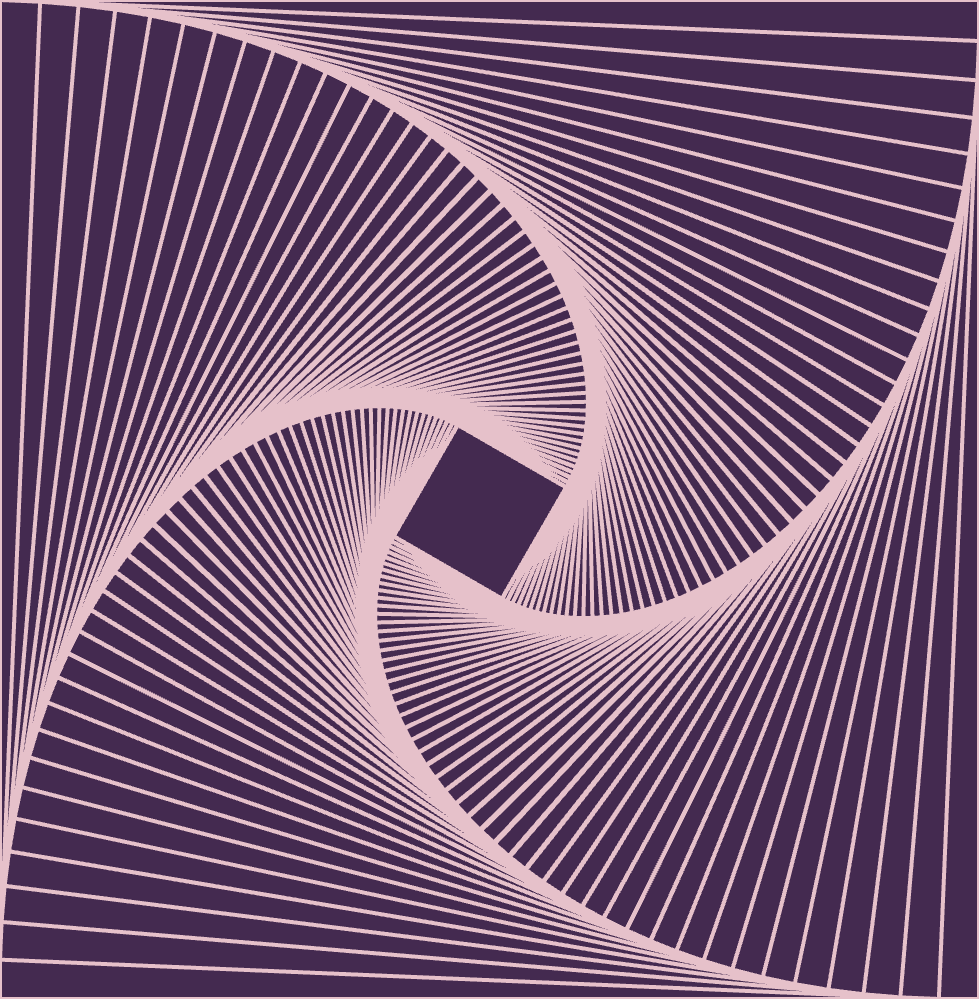
This code has resulted in the following spiral, my first ever creative generation!
 ◎ Spiral of Squares